

Update Rescheck Settings Tutorial
Many times on the Reschexpert blog we discuss ways to calculate, input, and figure out errors within the Pacific Northwest Laboratory and Department of Energy’s Rescheck Softwares. In Rescheck Web and Rescheck Desktop, there are many different inputs to take into consideration on each Rescheck Report that you create. Today we want to help DIY Rescheck Creators and at home Rescheck Calculators answer the questions of how to update their settings within Rescheck Web. Then give a brief description of each of the settings options available within Rescheck Web.
Start with the log in. You want to log in to Rescheck Web to bring up your account.
Once you are fully logged in to Rescheck Web then you want to look for the tiny gear icon in the right upper most corner of your Rescheck Web screen. Click on the gear icon.
Rescheck Web Gear Icon
Once in the settings page your Rescheck Web Screen should look like this. This is where the Rescheck settings are updated and maintained within your Rescheck software.
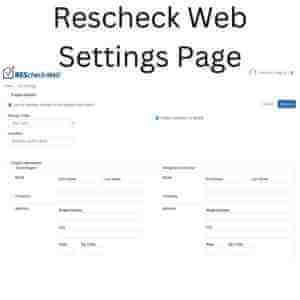
Rescheck Web Settings Page
Basically, this page makes a default setup for each Rescheck that you create within Rescheck Web. So if you find yourself typing in the same information multiple times it might be a good idea to update these settings on the Rescheck Web settings page. Starting in the upper left hand corner of the Rescheck Web Settings page let me describe each item and what it will change.
Your first setting to update will be checking the box that says “Use the following settings for new projects and reports.” This makes the data on this page the default information that will be shown on new projects.
Next you have energy code and location. We do a majority of our projects using IECC 2021 in Bismark, North Dakota so that is the location we use as a default for our Rescheck Web software. You are always able to change this information on each new project you create so do not worry if every Rescheck you create is not in this location. You just want to pick the most common location for you and your Rescheck area.
Next you want to click “Enable orientation by default” this will allow you the North, South, East, and West walls to show up on both the main level and foundation level walls that need Rescheck calculations. This toggle box shows up on the Rescheck Web software directly to the right of the settings we just updated for Energy Code and Location.
The next items you will look at are classified as Rescheck Project Information. This includes items like Owner/Agent and Designer/Contractor. If you specifically work with one person building multiple homes or if your contractor and architect never change then this is the spot to input their information so that you do not have to type the information in each time you create a Rescheck. Also if you end up doing a Rescheck project with a different owner/agent or designer/contractor then you can simply modify this information indiviudally on the project screen.
This concluded our easy to use tutorial on how to update your settings within Rescheck Web. If you require assistance with a Rescheck we can help. It takes us about 4-6 hours to create a Rescheck for you and the total cost is $79. To get a Rescheck designed for you just email us your PDF plans, jobsite address, and square footage to service@rescheck.info and we will get you taken care of.
Tired of reading the Reschexpert blog information about Reschecks? How about watching this Reschexpert Blog Rescheck post as a Youtube video?
 Copyright secured by Digiprove © 2022 Rescheck.info Reschexpert Blog, Rescheck Podcast